Your Trip Mate Mobile App Development
Designed & developed a trip assistant mobile application with React Native, Expo, and Google Firebase
Development
Frontend
Backend
UX Design
Prototyping

Project Overview
Duration: A month, November 2020 - December 2020
Role: Sole UX Engineer who Designs and Develops a Mobile App
Course Project: SI 669 Mobile App Development
Skills: Mobile App Development, Mobile App Design, UX Design, Prototyping
Programming: React Native (JavaScript)
Tools: Visual Studio (VS) Code, GitHub, Expo, Google Firebase, Adobe XD
Introduction
About Your Trip Mate
Your Trip Mate is a trip assistant mobile application developed with React Native, Expo, and Google Firebase. (This app was designed & developed for the final project of SI 669 Mobile App Development class at the University of Michigan.)
Problem & Challenge
When young adults travel, they often need to store their trip information in separate places. For example, they may put budget and spending information in the excel sheet (or Google Sheets), store pictures in the local phone gallery, and write notes or journals in the physical notebook. Also, since young adults tend to have a tight budget, they may need to track their spendings and check how much money is left frequently.
Your Trip Mate Solution
I developed a “Your Trip Mate (YTM)” app in which a user can plan for a trip, record the trip memory (pictures, notes, plan, budget, etc.), and check previous trips. The app will be beneficial to the users because it stores all information related to the trip in one digital place. Also, for users who need to track their spendings frequently, the app will calculate and display how much money is left automatically based on their budget and their spendings. Besides, the app is great for users because it lets users store their information in the cloud (Google Firebase), which leads to less worry about losing or missing files.
Process
For this project, I followed the Software Development Life Cycle (SDLC) like below.
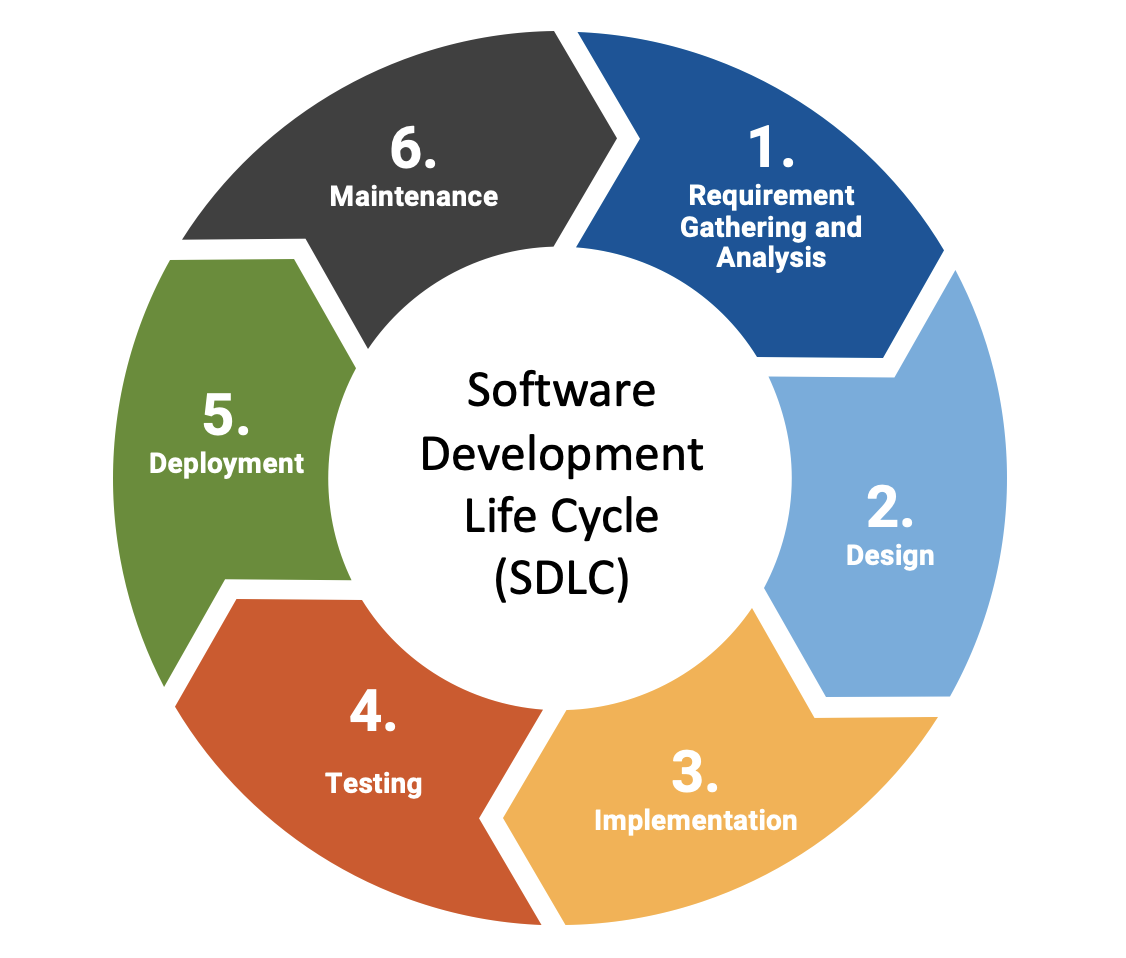
1. Requirement Gathering and Analysis
In this process, I first explored a current problem, identified the target audience, and specified the value proposition. For example, I started to look at the current problem that my friends and I had as young adults. When we traveled, we faced the challenge of storing trip information on a different platform, such as recording trip budget in Google Sheets, storing pictures in the local phone gallery, and writing journals in the physical notebook. Unfortunately, this class was not intended to actually research the users’ needs but developed the mobile application with intended users, I couldn’t dive into user research but made sure to meet my friends and colleagues and asked about their trip experiences and challenges. After finding the current problem, I identified the target audience and specified the value proposition like below.
- Target Audience: Young adults (18-24) who often travel with a tight budget
- Current Problem: When the target audience travels, they often need to store their trip information in separate places. For example, they may put budget and actual spending in the excel sheet (or Google Sheets), store pictures in the local phone gallery, and write notes or journals in the physical notebook. Also, since young adults tend to have a tight budget, they may need to track their spendings and check how much money is left frequently.
- Solution: I will develop a “Your Trip Mate (YTM)” app in which a user can plan for a trip, record the trip memory (pictures, notes, plan, budget, etc.), and check previous trips. The app will be beneficial to the users because it stores all information related to the trip in one digital place. Also, for users who need to track their spendings frequently, the app will calculate and display how much money is left automatically based on their budget and their actual spendings. Besides, the app is great for users because it lets users store their information in the cloud (Google Firebase), which leads to less worry about losing or missing files.
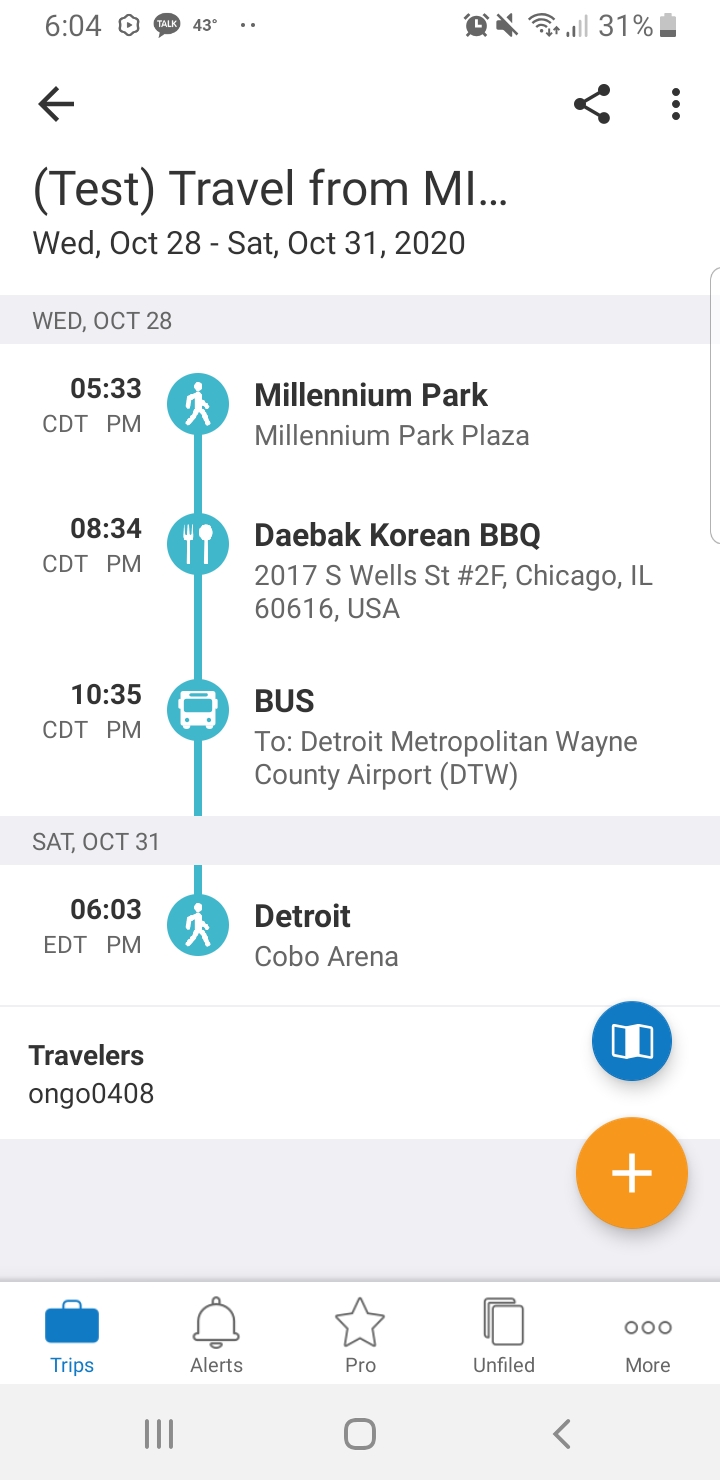
Also, I checked a couple of travel planner apps to get some inspiration and distinguish my app from others. For example, the TripIt app, a travel planner mobile app, displayed travel items vertically with a vertical line to show the continuation. I adopted the vertical style to display plan items to show that it was the ongoing top to bottom.
Although the TripIt app and Your Trip Mate app had a similar feature like preparing for a trip, Your Trip Mate app would provide some unique features like tracking budget and actual spending. Also, in the Your Trip Mate app, users would put a picture on each trip plan.
In addition, I defined a feature list for MVP.
Must-have
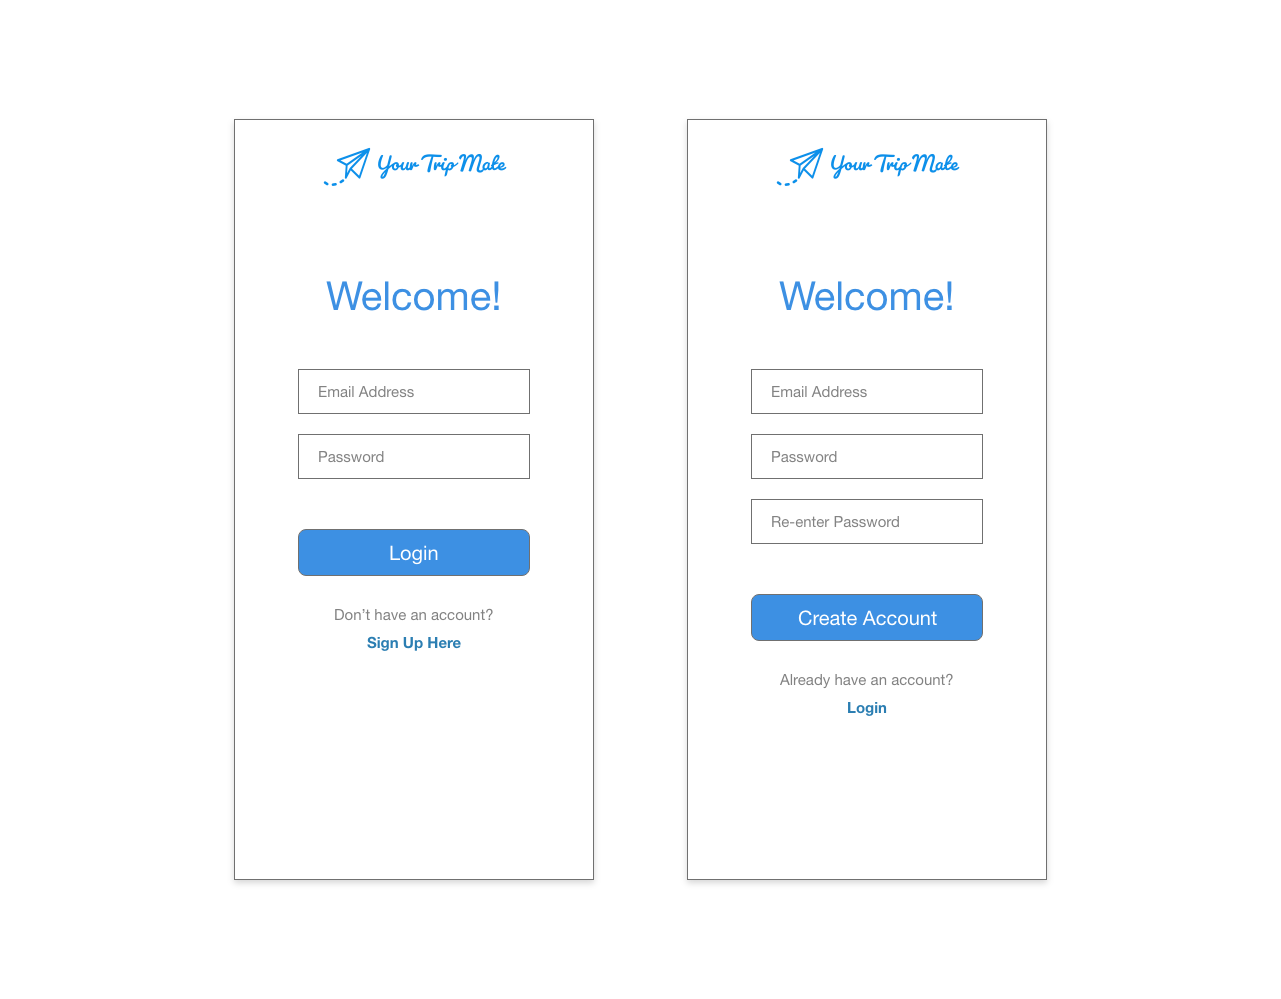
- A user can create a new account. (Login Screen)
- A user can log in with an existing account. (Login Screen)
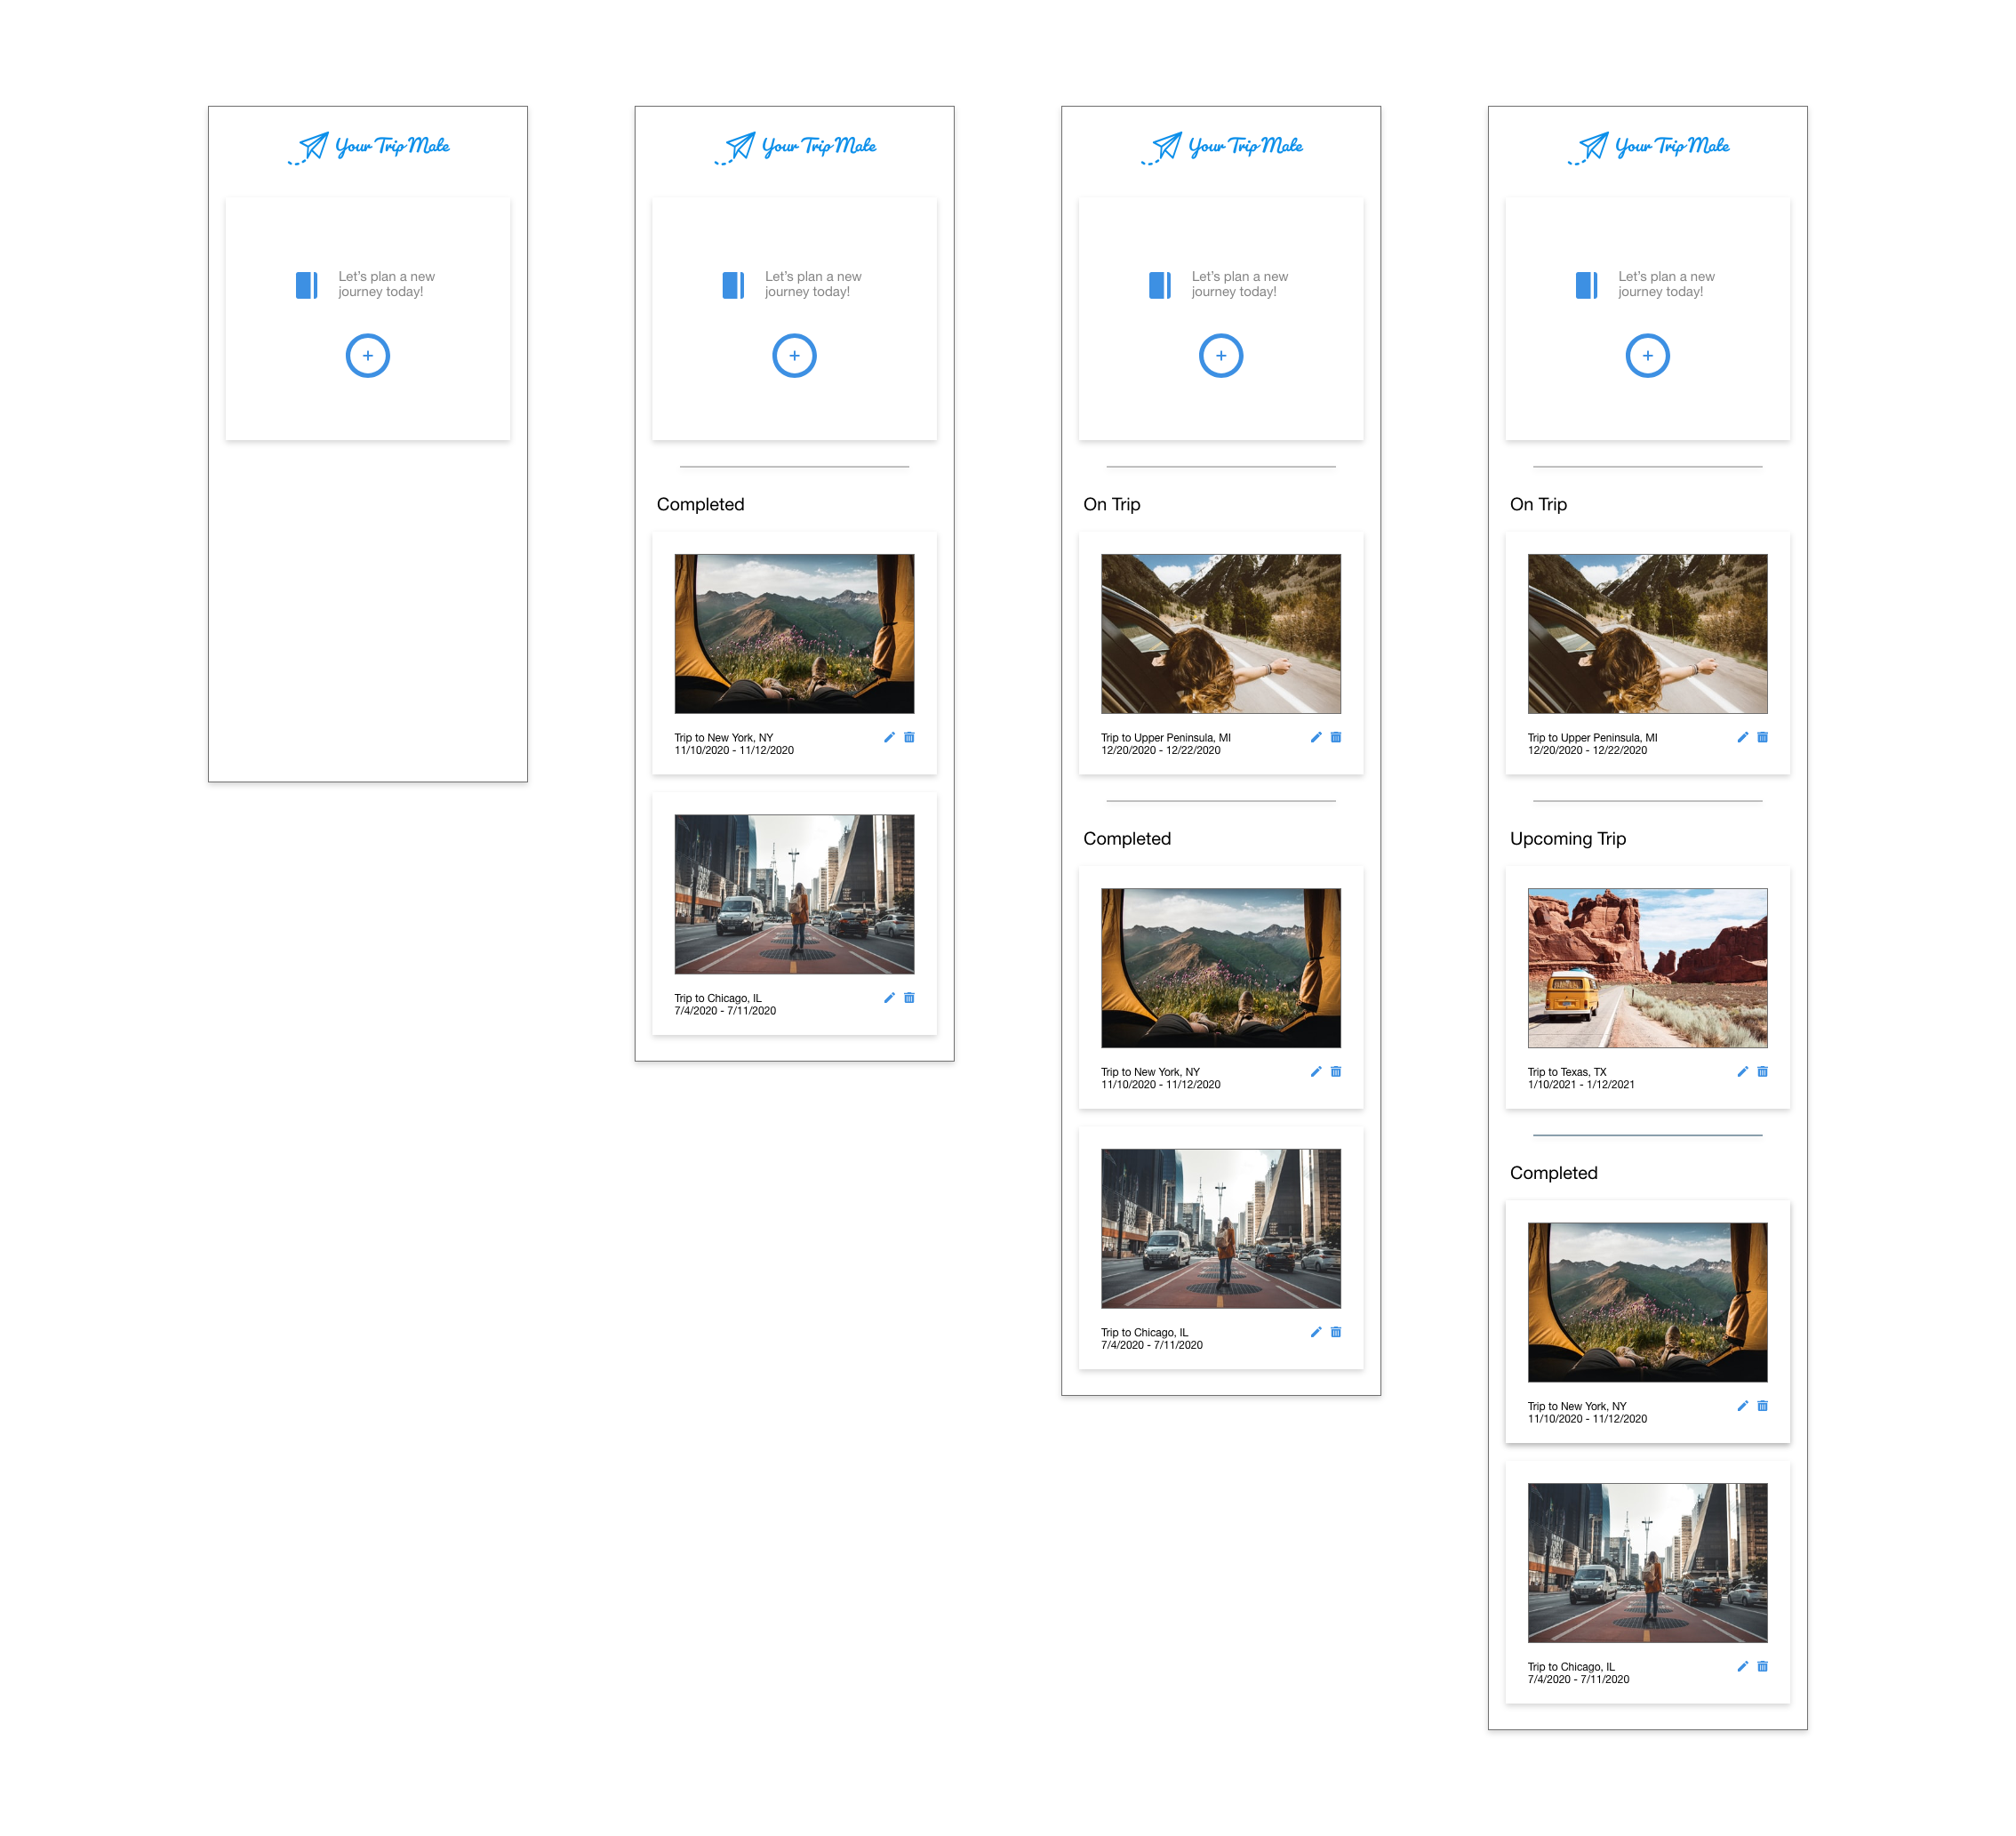
- A user can create a new trip plan by specifying a trip title, trip category, trip date, and notes on the Trip Plan Screen, and the new trip plan with the trip title and trip date will appear on the Home Screen when a user goes back home (Trip Plan Screen & Home Screen)
- A user can modify an existing trip plan (i.e., revising a trip title, trip date, trip category, and/or notes). (Trip Plan Screen)
- A user can delete a trip plan on the Home screen, and the trip plan will no longer be shown on the Home screen. (Home Screen)
- A user can create a new plan item with a plan title, plan date, budget, and spending on the Plan Item Screen, and the new plan item with the plan title will appear on the Trip Plan Screen (Plan Item Screen & Trip Plan Screen)
- A user can see the automatically calculated total budget, total spending, and money left based on budgets and spendings from each plan item on the Trip Plan Screen. (Trip Plan Screen)
- A user can modify an existing plan item (i.e., revising a plan title, plan date, budget, and/or spending) on the Plan Item Screen. (Plan Item Screen)
- A user can delete a plan item on the Trip Plan screen, and the plan item will no longer be shown on the Trip Plan screen. (Trip Plan screen)
Should-have
- A user can add a picture from Gallery or Photo app (a built-in app on the phone) on the Trip Plan Screen, and the added picture will also be shown on the Home Page (Trip Plan Screen & Home Screen).
- A user can choose a different trip status (“Upcoming,” “On Trip,” or “Completed”) on the Trip Plan Screen, and the new status section will be added (“Upcoming,” “On Trip,” or “Completed”) on Home Screen. (Trip Plan Screen & Home Screen)
Nice-to-have (Stretch goals)
- The trip date on the Trip Plan Screen will be automatically updated when the dates defined on each plan item are changed. (Trip Plan screen)
- A user can add multiple pictures on the Trip Plan screen. (Trip Plan screen)
- The trip status will be automatically changed from “Upcoming” to “On Trip” on the trip date.
- A user can add geolocation information (i.e., adding a map or getting current address information based on GPS)
2. Design
After the requirement gathering and analysis, I worked on the design of the app. I started to create a logo that could represent an open, free, and straightforward journey.

Also, I defined theme colors, typography, font sizes, button sizes, and icons for consistent design and development. For example, I chose a blue-based color (hex: #3D90E3) as a primary color because it could show openness and freedom. (Also, blue is my personal favorite color as well : ) ). Based on the basic setup, I created a mobile prototype using Adobe XD.
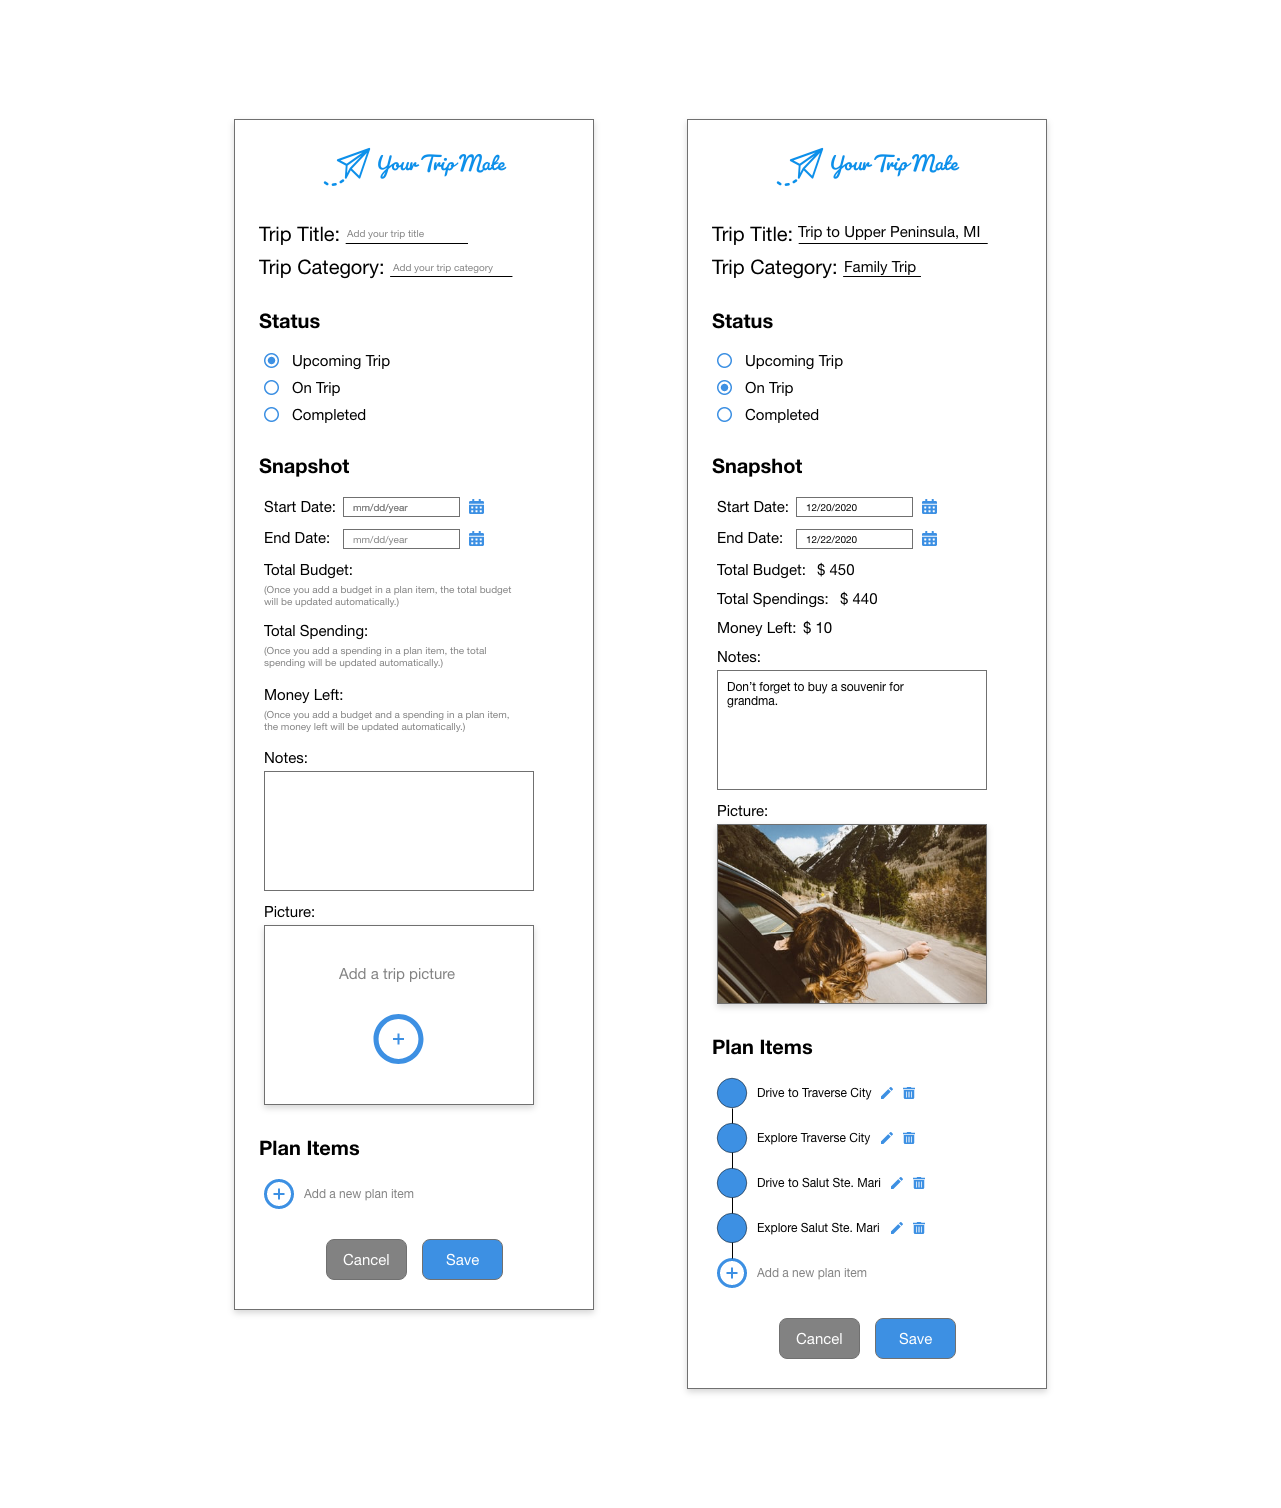
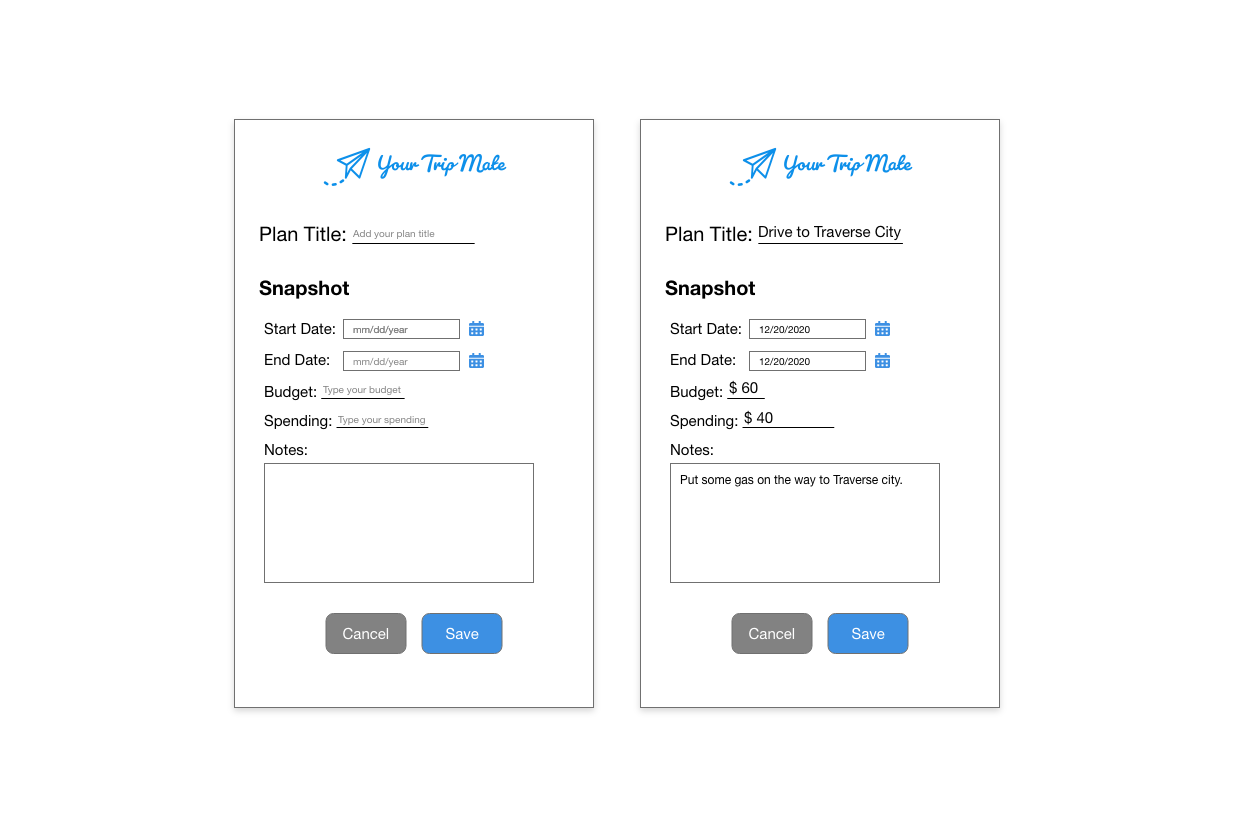
3. Implementation (Development)
Based on the design, I started to work on the development. I first wrote down an overall plan like…
-
Set up
- GitHub
- expo init (CLI)
- Installation
- Navigation
- Icon
- DateTimePicker
- ImagePicker
- Firebase
- etc
- .gitIgnore
- Create
Secrets.jsthat containsfirebaseConfigobject - Add
Secrets.jsto the.gitignore
- Create
- Work on Logo Component
- Work on Login/Create UI
-
Configure
DataModel.js - Work on Home UI
-
Update
DataModel.js - Work on TripPlan UI
-
Update
DataModel.js - Work on PlanItem UI
-
Update
DataModel.js - Code Refinement and Final Testing
For each plan, I also wrote a pseudo code. For instance, for the “Work on Login/Create UI,” I wrote…
-
Import
View,Text,TextInput,TouchableOpacity,ScrollView -
Import
Logocomponent -
Specify
statemode: 'login'emailInput: ''passwordInput: ''passwordCheckInput: '
- Overall UI (Logo, Header, TextInputs, Button, etc)
-
Configure state change
-
Add
onCreateAccount()function for a new user -
Add
onLogin()function for an existing user
-
Add
As I worked on the development, I updated the plan and pseudo code a couple of times when I found more effective ways to write a code or found a new requirement. Also, I frequently tested the update on the actual mobile phone.
Throughout the project, I used React Native (JavaScript), Expo, and Google Firebase. Expo is a framework and a platform for universal React applications. It provides built in tools and services based on the React Native and native platforms that help developers develop, build, delploy, and iterate on iOS, Android, and web apps (Reference: Expo Docs). Google Firebase is Google’s BaaS (Backend-as-a-service) and is used by a million developers and thousands of apps including companies like Instacart, Twitch, Alibaba, CBS, and NPR. Also, Firebase is a NoSQL database, which simply says that all data items are stored as “documents,” which looks very similar to JSON objects. Here is my data model.
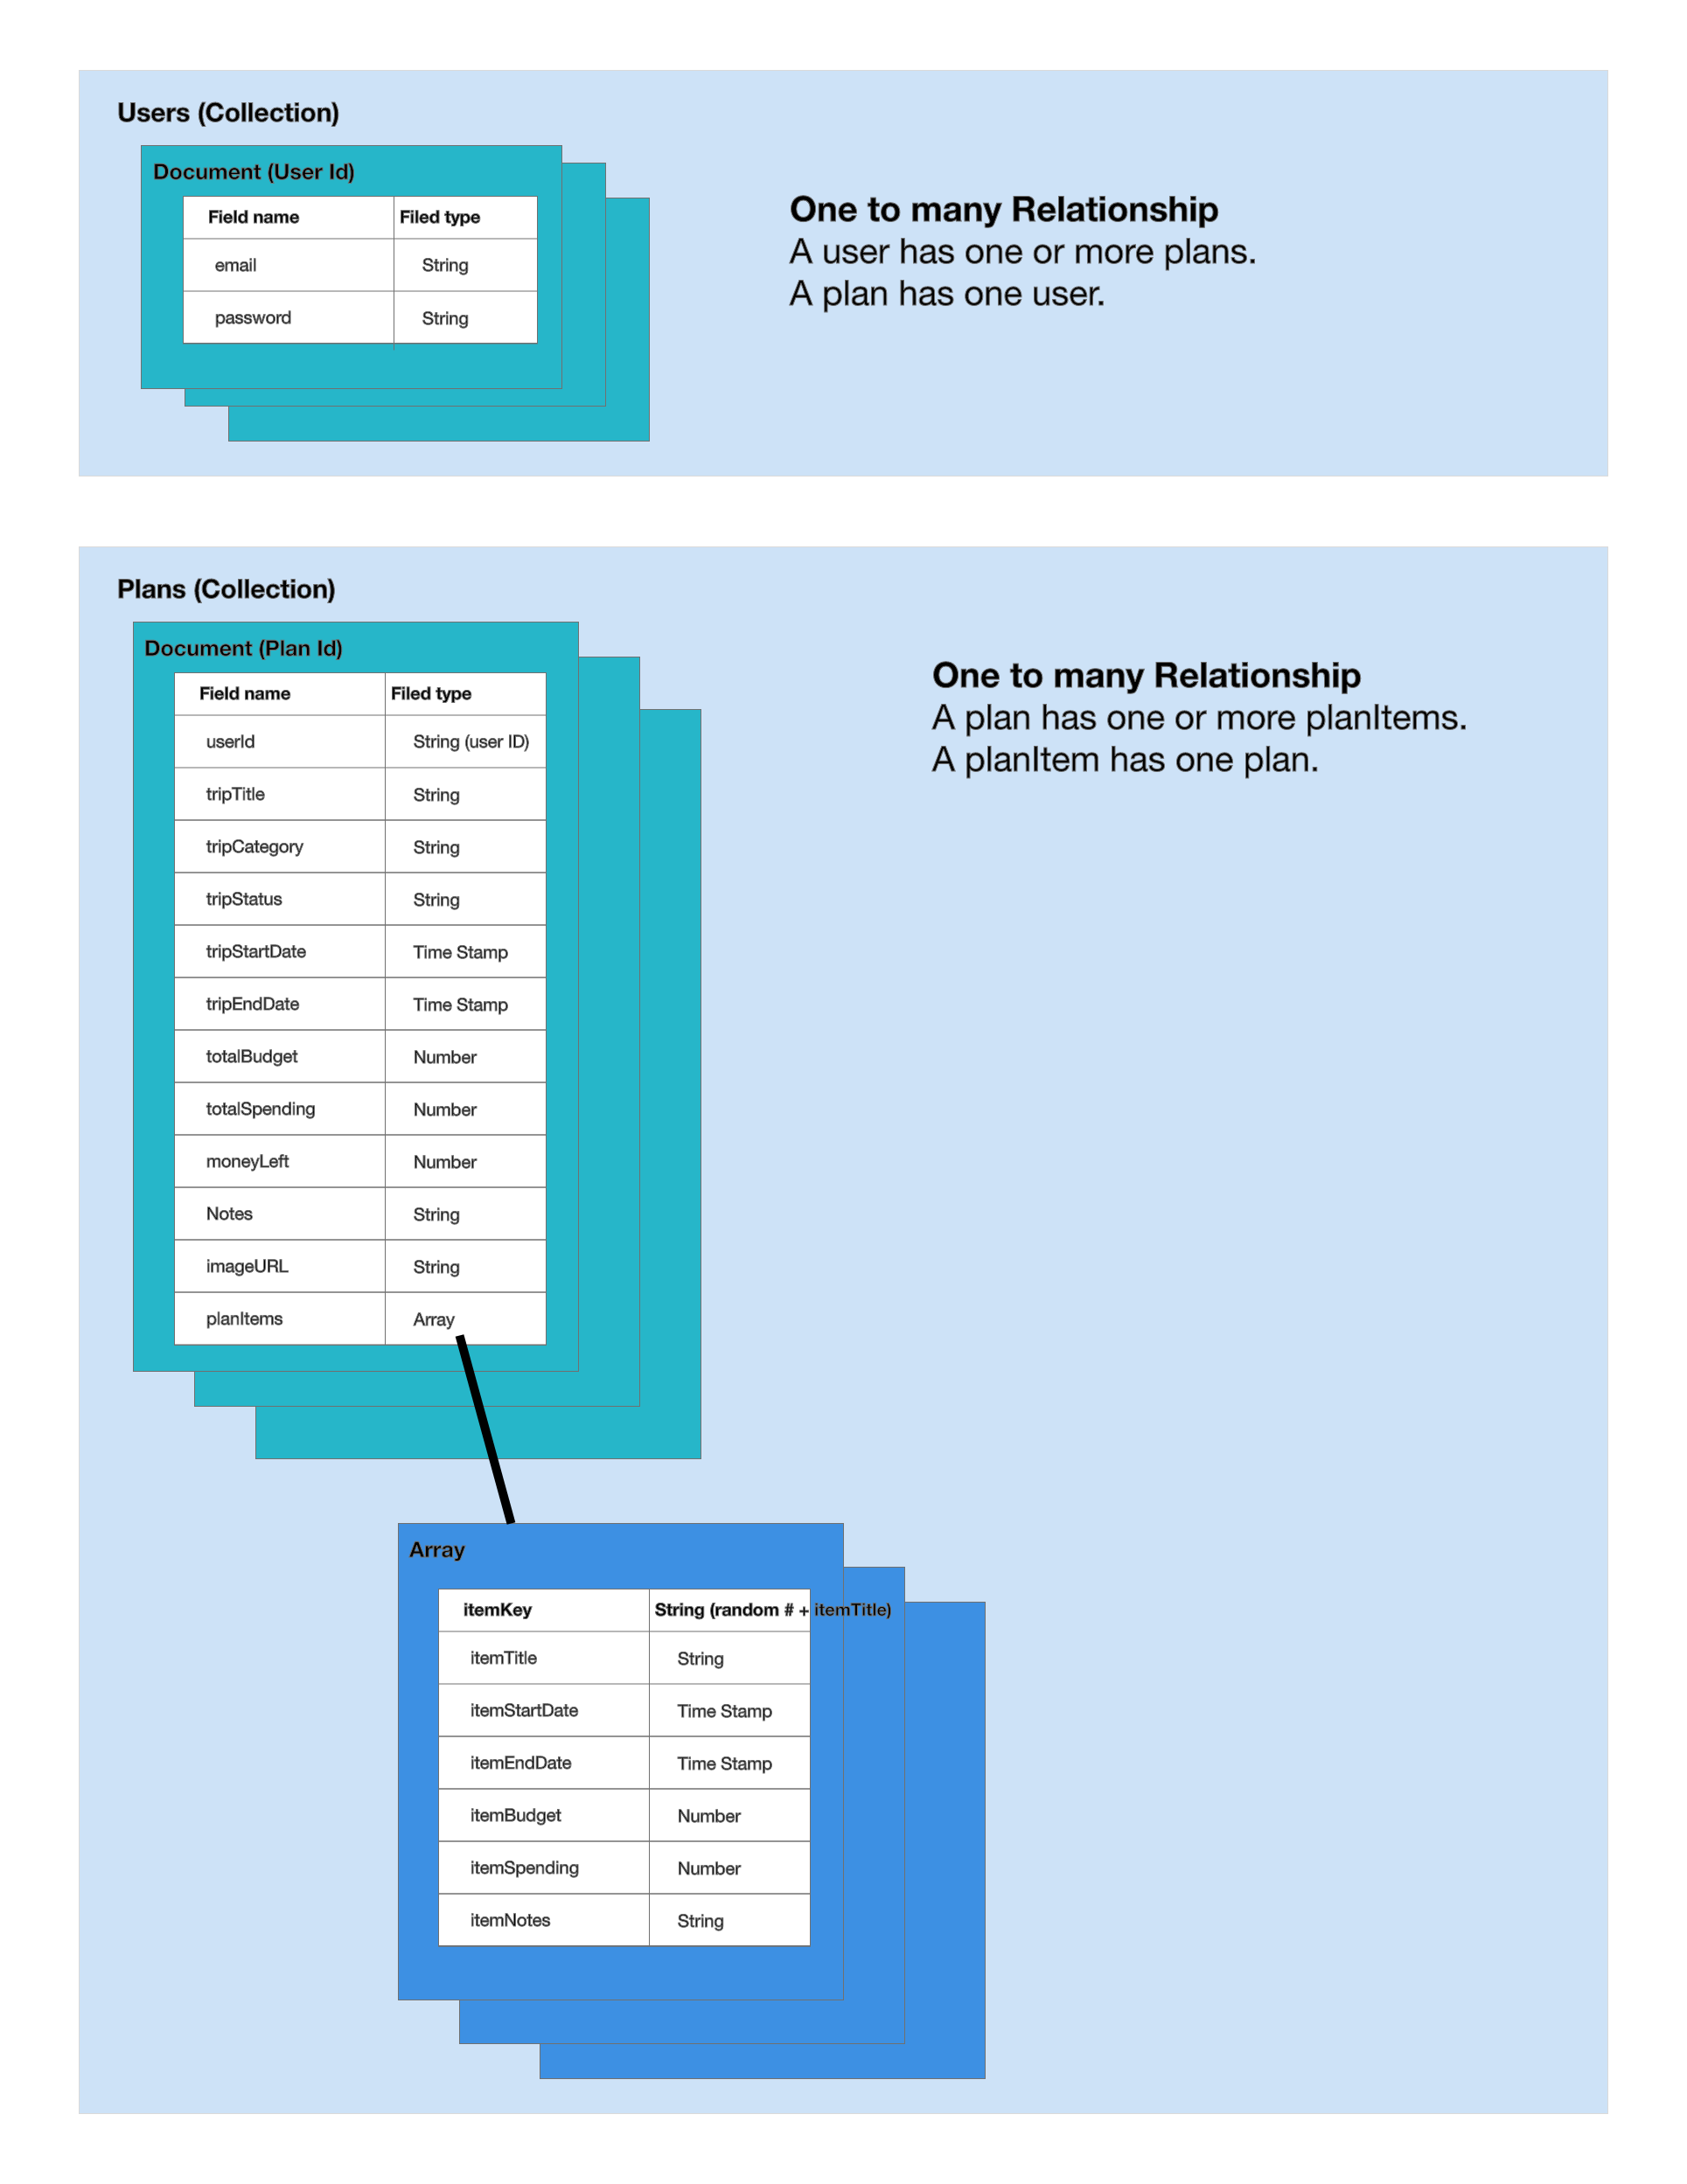
While working on the development, I followed the DRY (Don’t Repeat Yourself) method and separate codes by MVC (Model-View-Controller) as much as possible. For example, I created a Logo component, imported it into the other screens, and used FlatList & SectionList to iterate trip collections. As to the MVC, I separated Logic (Controller) and DataModel (Model) from the main UI (View). For instance, I used a singleton pattern for the database and had DataModel.js, which was the sole code to CRUD (Create, Read, Update, Delete) the Google Firebase.
For the detailed codes, please check my GitHub.
4. Testing
Although React Native is good at cross-platform development (Android and iOS), I focused on the Android for MVP due to time constraints. (The final project was only required to check one platform due to the time constraint.) I used my Android phone to check my updates frequently and checked all the features thoroughly before submitting my final code.
5. Deployment & 6. Maintenance
Due to the COVID-19 pandemic, the class had to change its schedule and couldn’t cover deployment. The requirement of the final project was to develop the app and test it on the actual phone but not deployment. My next step is to learn how to deploy the Your Trip Mate through Expo. (Reference: Deploying to App Stores)
Outcome
I successfully completed all feature lists on time with a matched UI. I pushed my code to GitHub and presented my app to the professor at the end. As a result, I could get A+ from the course.
Demo Video (without narrative)
Presentation Video (containing the demo video with narrative from 2 minutes and10 seconds)
Takeaway
The biggest takeaway from this project was that I could involve in from the beginning to the end. I started from finding a current problem and specifying a value proposition to design and develop the app. It was also a great experience to learn and apply the MVC model and work on both frontend and backend. As I mentioned before, my next step will be to learn how to deploy the Your Trip Mate app through Expo. (Reference: Deploying to App Stores)
